Blazor Server App Authentication Notes
This document describes the setup for *Blazor Server* apps.
|
1. First, Some Definitions
| A few key terms that will be beneficial to configuring a Blazor Server application for authentication and authorization: |
- Microsoft Identity platform
-
Was Azure Active Directory (Azure AD) but is now Microsoft Entra ID.
Used to authenticate and authorize users in web apps, web APIs, or apps that call protected web APIs. - Microsoft Identity Web authentication library
-
The GitHub project an be found here
Is a set of ASP.NET Core libraries that simplifies adding authentication and authorization support to web apps, web APIs, and daemon apps integrating with the Microsoft identity platform.
It provides a single-surface API convenience layer that ties together ASP.NET or ASP.NET Core, their authentication middleware, and the Microsoft Authentication Library (MSAL) for .NET that acquires tokens.
Learn more about it here.
- OpenID Connect protocol
-
Used for handling authentication. More info about OpenID can be found here.
- OAuth 2.0 protocol
-
Used for handling authorization. More info about OAuth 2.0 can be found here.
- Authentication
-
The process of confirming that a user is the person that they say they are. The user is represented by an identity.
- Authorization
-
After a user’s Identity has been confirmed, what are they allowed to access? Access is determined based on a combination of their Identity and the roles or claims associated with their Identity.
- Role
-
A Role is simply a name like admin, supervisor, or content_manager. A user can have more than one role assigned to them which can then be checked by the application at runtime. The application can then authorize access to various application functionality based on these roles.
- Claim
-
A Claim is an assertion by the user such as their name or email address. It can also be very specific to an aspect of the application such as canClickTheUpdateAccountButton. A Claim is like a Role but more granular. Claims are steadily becoming more favored over Roles.
- App Role
-
Are custom roles to assign permissions to users or apps. The application defines and publishes the app roles and interprets them as permissions during authorization.
Follow this doc to setup app roles.
- RBAC
-
Role-based access control (RBAC) is a popular mechanism to enforce authorization in applications. RBAC allows administrators to grant permissions to roles rather than to specific users or groups. The administrator can then assign roles to different users and groups to control who has access to what content and functionality.
By using RBAC with application role and role claims, developers can securely enforce authorization in their apps with less effort.
3. Azure Portal Tasks
3.1. Create new App Registration
-
Launch the
Azure portaland navigate to App registrations or click here. -
Confirm you’re in the Xackley! Studio LLC Directory.
-
Look in the upper right hand corner.
-
In the following example, we’re in the DEFAULT DIRECTORY - we don’t want to be here.

-
Click the persona icon.
-
Click on the Switch Directory link.
-
Now click on the Switch button to change to the directory from the currently select one to the Xackley! directory.

-
Now the persona should indicate the Xackley! Studio LLC Directory

-
-
Click the + New registration button and provide a name for your application.
-
Provide a Name.
The Name doesn’t need to match the VS Project name. -
For the Supported account types select the radio button for:
Accounts in any organizational directory (Any Microsoft Entra ID tenant - Multitenant) and personal Microsoft accounts (e.g. Skype, Xbox) value -
Provide values for:

-
Select Web as the platform and enter your redirect URIs e.g.:
https://localhost:5000/signin-oidc
-
-
Click the Register button.
-
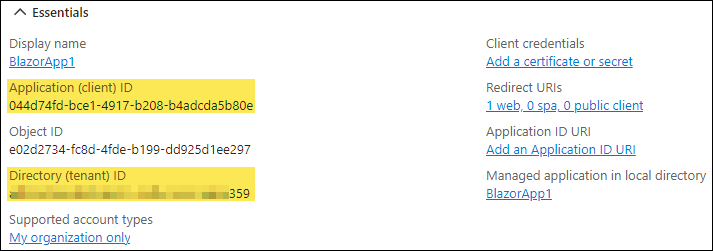
Note the Application (client) ID and Directory (tenant) ID:
-
These will be required later…
-
-
Click on menu item
-
Click checkbox for ID tokens (used for implicit and hybrid flows)
-
Click the Save button.
4. Application Updates
4.1. Install required NuGet packages
-
Add the following packages to the Blazor Server project.
-
Microsoft.AspNetCore.Authentication.OpenIdConnect
-
Microsoft.Identity.Web
-
Microsoft.Identity.Web.UI
-
4.2. Update References
-
Add the following to Components\_Imports.razor:
@* Added for Microsoft EntraID *@
@using Microsoft.AspNetCore.Components.Authorization
4.3. Update appsettings.json
-
Add the following to appsettings.json:
  "EntraID": {
    "Instance": "https://login.microsoftonline.com/",
    "Domain": "xackleystudio.onmicrosoft.com",
    "ClientId": "044d74fd-bce1-4917-b208-b4adcda5b80e", (1)
    "TenantId": "abcdefgh-5bd9-4c97-a5f4-7a3a76436359", (2)
    "CallbackPath": "/signin-oidc",
    "Scopes": ""
  }
1 Replace with the value discovered earlier 2 Replace with the value discovered earlier
4.4. Update Program.cs
-
At the top of Program.cs file add:
// Added for Microsoft EntraID using Microsoft.AspNetCore.Authentication.OpenIdConnect; using Microsoft.Identity.Web; using Microsoft.Identity.Web.UI; // End of additions for Microsoft EntraID -
After the following in Program.cs:
// Add services to the container.
builder.Services.AddRazorComponents()
    .AddInteractiveServerComponents();
Add the following to Program.cs:
// Added for Microsoft EntraID builder.Services.AddServerSideBlazor() .AddMicrosoftIdentityConsentHandler(); builder.Services.AddAuthentication(OpenIdConnectDefaults.AuthenticationScheme) .AddMicrosoftIdentityWebApp(builder.Configuration.GetSection("EntraID")); builder.Services.AddControllersWithViews() .AddMicrosoftIdentityUI(); builder.Services.AddAuthorization(options => { options.FallbackPolicy = options.DefaultPolicy; }); builder.Services.Configure<ForwardedHeadersOptions>(options => { options.ForwardedHeaders = ForwardedHeaders.XForwardedProto; // if you’re in Docker or on an internal network, you may need to clear these options.KnownNetworks.Clear(); options.KnownProxies.Clear(); }); // End of additions for Microsoft EntraID -
After the following in Program.cs:
app.UseStaticFiles();
app.UseAntiforgery();
Add the following to Program.cs:
// Added for Microsoft EntraID
app.UseForwardedHeaders();
app.UseAuthentication();
app.UseAuthorization();
app.MapControllers();
// End of additions for Microsoft EntraID
4.5. Create/Update Pages
4.5.1. Create Components\Layout\LoginDisplay
-
Create the Components\Layout\LoginDisplay.razor file:
In the following code, the ability to log in is also accounted for but, it never gets used.
There doesn’t seem to be a way to initiate the Microsoft Identity log in process; it just happens automatically.
<AuthorizeView>

    <Authorized>
        <!-- Content to display when the user is logged in -->
        Welcome, [@context?.User?.Identity?.Name]!
        <a href ="MicrosoftIdentity/Account/SignOut">LogOut</a>
    </Authorized>

    <NotAuthorized>
        <!-- Content to display when the user is not logged in -->
        <h1>Please log in to access this page.</h1>
        <p><a href="MicrosoftIdentity/Account/SignIn">Login</a></p>
    </NotAuthorized>

</AuthorizeView>

@code {
}
4.5.2. Update Components\Routes.razor
-
Update with the following:
<CascadingAuthenticationState>
    <Router AppAssembly="typeof(Program).Assembly">
        <Found Context="routeData">
        @* <RouteView RouteData="routeData" DefaultLayout="typeof(Layout.MainLayout)" />
        <FocusOnNavigate RouteData="routeData" Selector="h1" /> *@

            <AuthorizeRouteView RouteData="@routeData" DefaultLayout="@typeof(Layout.MainLayout)">
                <NotAuthorized>
                    <p>Sorry, you're not authorized to reach this page.</p>
                    <p>You may need to log in as a different user.</p>
                </NotAuthorized>
            </AuthorizeRouteView>
        </Found>
        <NotFound>
            <PageTitle>Not found</PageTitle>
            <LayoutView Layout="@typeof(Layout.MainLayout)">
                <XS_Error404 />
            </LayoutView>
        </NotFound>
    </Router>
</CascadingAuthenticationState>
4.5.3. Update MainLayout.razor
-
Update Components\Layout\MainLayout.razor
@inherits LayoutComponentBase

<div class="page">
    <div class="sidebar">
        <NavMenu />
    </div>

    <main>
        <div class="top-row px-4">
            <LoginDisplay />
        </div>

        <article class="content px-4">
            @Body
        </article>
    </main>
</div>

<div id="blazor-error-ui">
    <environment include="Staging,Production">
        An error has occurred. This application may no longer respond until reloaded.
    </environment>
    <environment include="Development">
        An unhandled exception has occurred. See browser dev tools for details.
    </environment>
    <a href="" class="reload">Reload</a>
    <a class="dismiss">🗙</a>
</div>
5. Utilizing Authentication and Authorization in the Blazor App
5.1. Creating and Assigning Roles in Entra ID
| This is a two-step process where Roles are first created and then assigned to users. |
5.1.1. Create Role(s)
-
Find the app’s registration from the list.
Make sure you’re in the Xackley! Studio LLC Directory. -
Click on the App.
If you don’t see the app, you may need to first click on the All applicationsTab. -
In the left hand menu, click on menu item.
-
Click on + Create app role button and create the app role.
Code will reference the name provided in the Value field of the role and not the Display Name of the role. -
Provide a Display name, e.g. Read-Only
-
Choose the Users/Groups radio button.
-
Provide a Value that will be referenced in code, e.g., read-only
-
Provide a Description of this
app role. -
Click the Apply button.
-
5.1.2. Assign Role(s)
-
Find the app’s registration from the list and click on it.
If you don’t see the app, you may need to first click on the All applications Tab. -
Within the
Essentialssection, click on theManaged application in local directorylink which should be pointing to the app name. -
Click on the Assign users and groups button.
-
This will show an existing list of user/app role assignments.
-
To add an additional user/app role assignment
-
Click the + Add user/group button.
-
Under
UsersClick on None Selected link. -
Select the users by clicking the checkbox next to their names and then click the Select button at the bottom.
-
Under
Select a roleClick on None Selected link. -
Select a role by clicking the name and then click the Select button at the bottom.
-
Now click the Assign button at the bottom.
-
-
To edit an existing user/app role assignment, check the checkbox, and then click the Edit assignment button.
Do not click on the username! -
Finished but…
Important:Changes to role and assignments do not take effect until the user logs out and then back in!
5.2. Access User Profile Details
@code {
[CascadingParameter]
private Task<AuthenticationState>? authenticationState { get; set; }

private string UserName { get; set; } = string.Empty;
private string PreferredUserName { get; set; } = string.Empty;

protected override async Task OnInitializedAsync()
{
    if (authenticationState is not null)
    {
        var state = await authenticationState;

        // Get `name` claim
        UserName = state?.User.Claims
            .Where(c => c.Type.Equals("name"))
            .Select(c => c.Value)
            .FirstOrDefault() ?? string.Empty;

        // Get `preferred_username` claim
        PreferredUserName = state?.User.Claims
            .Where(c => c.Type.Equals("preferred_username"))
            .Select(c => c.Value)
            .FirstOrDefault() ?? string.Empty;
    }
}
5.3. Add Authorization via Claims (Roles)
-
There are two ways to do this:
-
Test for Claims (Roles):
Expand for Method 1
Code to replace home.razor@page "/" <PageTitle>Home</PageTitle> <h1>Hello, world!</h1> @if (HasAdminRole) { <p>Has Admin Role!</p> } else { <p>Sorry - doesn't have the Admin Role.</p> } @if (HasReadOnlyRole) { <p>Has Read-Only Role!</p> } else { <p>Sorry - doesn't have the Read-Only Role.</p> } @code { [CascadingParameter] private Task<AuthenticationState>? authenticationState { get; set; } private bool HasAdminRole { get; set; } = false; private bool HasReadOnlyRole { get; set; } = false; protected override async Task OnInitializedAsync() { if (authenticationState is not null) { var state = await authenticationState; // Test for Roles if (state.User.IsInRole("admin")) { HasAdminRole = true; } if (state.User.IsInRole("read-only")) { HasReadOnlyRole = true; } } } } -
This is an alternate method:
Method 2<AuthorizeView Context="YourContext" Roles="role1,role2"> (1) (2) <Authorized> (3) <p>You are Authorized</p> </Authorized> <NotAuthorized> (4) <h1>Sorry, but you are not Authorized</h1> </NotAuthorized> </AuthorizeView1 The Contexttag is only required if some other component is using the default context2 Any matching role will satisfy the condition 3 Code in this block will be executed if the authenticated user satisfies the role condition 4 Code in this block will be executed if the authenticated user is not in at least one of the listed roles
-
6. Publishing the App
6.1. Reverse Proxy Setting
These instructions are for Nginx Proxy Manager
|
This will fix the 502 Bad Gateway error
|
-
Launch the
Nginx Proxy Managerweb gui -
Click on the Proxy Hosts button
-
At the end of the row of the affected
proxy host, click on the 3 vertical dots menu to bring up the dropdown menu. -
Click on the Edit button
-
Click on the Advanced button.
-
Within the
Custom Nginx Configurationfield, add the following config:proxy_busy_buffers_size 512k; proxy_buffers 4 512k; proxy_buffer_size 256k; -
Click the Save button
6.2. Set Forward Headers
For published apps behind a reverse proxy e.g., Nginx Proxy Manager, additional configuration is required in the app’s middleware pipeline.
|
-
Open
Program.cs -
Add the following code afer
var app = builder.Build();but before theapp.UseAuthentication();line:Additional code for redirect URI/* Required to address this issue: Redirect URI specified in the request does not match the redirect URIs configured for the application */ app.UseForwardedHeaders(new ForwardedHeadersOptions { ForwardedHeaders = ForwardedHeaders.XForwardedProto });
6.3. Configure the App Registration’s Redirect URI’s
-
Navigate to the Azure Portal.
-
Under
Azure servicesclick on Microsoft Entra ID -
In the left hand menu, click on
-
Click on All applications tab button to see all existing apps
-
Click on the app registration
-
Add
Web Redirect URI-
Click on the link under the
Redirect URI’sheading. -
In the
Websection, click Add URI -
Provide a URI formatted like the following:
Examplehttps://components.xackleystudio.com/signin-oidc
-
-
Add
Front-channel logout URL-
In the
Front-channel logout URLsection add an entry like the following:Examplehttps://components.xackleystudio.com/signout-oidc
-
-
Click the Save button