Python Notes
2. Where is Python installed on Windows?
-
Open a cmd prompt and execute the following:
$ py --list-pathsSample OutputInstalled Pythons found by C:\WINDOWS\py.exe Launcher for Windows * -3.10-64 C:\Users\<user name>\AppData\Local\Programs\Python\Python310\python.exe -3.9-64 C:\Users\<user name>\AppData\Local\Programs\Python\Python39\python.exe
3. Python Linters
3.1. Ruff
-
Ruff is available as a
Visual Studio Code Extension.-
Disable the following Extensions:
-
Pylint - checks for errors, enforces a coding standard, looks for code smells, and can make suggestions about how the code could be refactored
-
Pylance - the language server providing type checking and other features
-
-
Enable the
RuffExtension
-
3.2. Pylint
-
To disable specific
pylintmessage codes within a particular source file, add similar comments to the following at the top of the file.Expand for example pylint message codes
#region suppress pylint messages
# pylint: disable=broad-exception-caught
# pylint: disable=broad-exception-raised
# pylint: disable=global-statement
# pylint: disable=global-variable-undefined
# ppylint: disable=invalid-name
# pylint: disable=line-too-long
# pylint: disable=missing-class-docstring
# pylint: disable=missing-function-docstring
# pylint: disable=missing-class-docstring
# pylint: disable=multiple-statements
# pylint: disable=too-few-public-methods
# pylint: disable=too-many-branches
# pylint: disable=too-many-locals
# pylint: disable=too-many-instance-attributes
# pylint: disable=too-many-statements
# pylint: disable=trailing-whitespace
#endregion
4. How to Start Interactive Mode
-
Open a cmd prompt and execute the py -3 command:
C:\Users\<user_name>py -3  (1)
Python 3.10.4 (tags/v3.10.4:9d38120, Mar 23 2022, 23:13:41) [MSC v.1929 64 bit (AMD64)] on win32
Type "help", "copyright", "credits" or "license" for more information.
>>> print("Hello")      (2)
Hello
>>> quit()              (3)
1 Execute this command to start v3 of Python. 2 Run a Python command. 3 Quit the interactive shell.
5. Packages
-
Full document can be found here.
-
If the intention is to install a package into a venv, confirm that the venv is the current directory.
-
5.2. List Packages
-
Open a cmd prompt and execute one of the following:
Windowspy -3 -m pip listvenvpip list
5.3. List Packages Location
-
Open a cmd prompt and execute one of the following:
Windowspy -c "import site; print(site.getsitepackages())"Linuxpython3 -c "import site; print(site.getsitepackages())"
5.4. Install a Package
-
Open a cmd prompt and execute one of the following:
Windowspy -3 -m pip install SomePackageUnixpython -m pip install SomePackagevenvpip install SomePackage
6. Python Virtual Environment (venv) on Windows
-
Full document can be found here.
6.1. Summary
-
A Python Virtual Environment is simply a folder containing a specific version of a Python interpreter bundled together with specific Python packages.
6.2. Create venv
-
Open a cmd window and run the following command:
py -3 -m venv tutorial-env (1)1 This will create a venv folder named tutorial-env. -
The previous step created a new venv folder named
tutorial-env.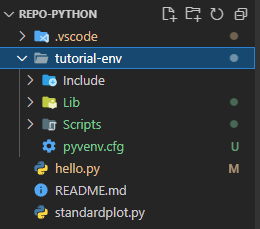
-
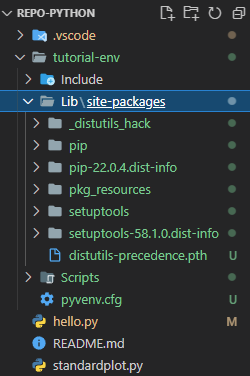
Within that new folder is an initial set of packages.
6.3. Select venv
-
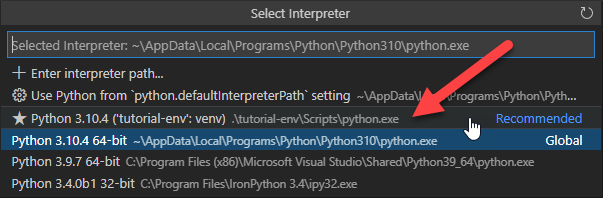
Now select the
Python Interpreterwithin the new venv folder:-
Open the Command Palette via Ctrl+Shift+P and select the venv:
-
-
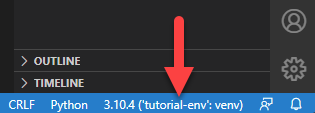
Now in the lower right hand corner of the IDE, you’ll see that the venv is selected:
6.4. Override the Venv Python with a System Python
-
Identify a system Python. Open a cmd prompt and execute the following:
py --list-pathsSample OutputInstalled Pythons found by C:\WINDOWS\py.exe Launcher for Windows * -3.10-64 C:\Users\<user name>\AppData\Local\Programs\Python\Python310\python.exe -3.9-64 C:\Users\<user name>\AppData\Local\Programs\Python\Python39\python.exeIn this example, two system Python executables were identified.
-
Create the soft link
-
The Python interpreter in the venv will be deleted in a later step so confirm that it is not currently selected.
If not sure run the deactivate script:
.\script\deactivate -
Launch a CMD window
-
cdinto the venv folderExamplecd C:\Users\<user name>\source\repos\GitLab\repo-python\tutorial-env -
Delete the current python.exe from the
Scriptsfolderdel .\Scripts\python.exe -
Create a link to the system Python identified in an earlier step.
mklink LinkName TargetFilePathExamplemklink .\Scripts\python.exe C:\Users\<user name>\AppData\Local\Programs\Python\Python310\python.exe New-Item -Path ".\Scripts\python.exe" -ItemType SymbolicLink -Value "C:\Users\mattosd\AppData\Local\Programs\Python\Python310\python.exe"
-
-
Copy DLL
-
The python3xx.dll will need to be copied into the venv’s
Scriptsfolder:Examplecopy "C:\Users\<user name>\AppData\Local\Programs\Python\Python310\python310.dll" .\scripts
-
7. GUI TKinter
8. DB Access
8.1. PyODBC
-
Install
pyodbcpy -3 -m pip install pyodbc
8.1.1. MSSQL Server
-
Confirm an existing
ODBC Driver for Sql Serverdriver via the ODBC tool. The following indicates that version 17 of the driver is installed: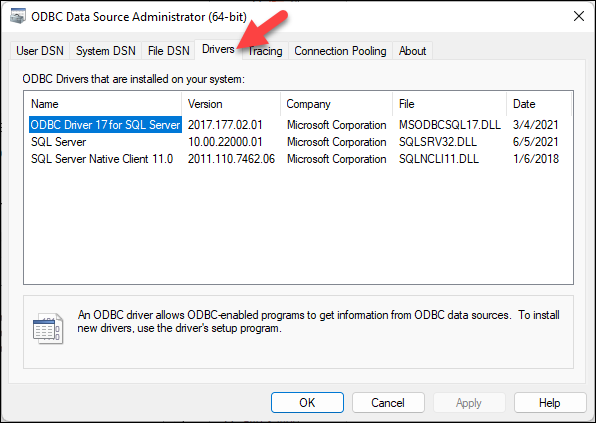
-
If the driver doesn’t exist or is an older version, install ODBC Driver for SQL Server:
-
Download installer from here .
-
-
Install the Python driver:
py -3 -m pip install pymssql -
Code example:
import pyodbc
# Some other example server values are
# server = 'localhost\sqlexpress' # for a named instance
# server = 'myserver,port' # to specify an alternate port
server = 'tcp:myserver.database.windows.net'
database = 'mydb'
username = 'myusername'
password = 'mypassword'
cnxn = pyodbc.connect('DRIVER={ODBC Driver 17 for SQL Server};SERVER='+server+';DATABASE='+database+';UID='+username+';PWD='+ password)  (1)
cursor = cnxn.cursor()
1 Note that version 17 of driver is specified in the connection string.