MCP Notes
1. What is MCP?
-
Read about MCP here.
2. Demo
-
Requirements:
-
VSCode configured to run Python scripts.
-
The Continue Open Source AI coding extension.
-
2.1. Create an MCP Server in Python
-
Create an
MCPserver using FastMCP-
Create with the following code
Expand for the sample Python script
Sample Python MCP Serverfrom datetime import datetime, timezone import html from fastmcp import FastMCP # Assuming `fastmcp` is a third-party package # Create an MCP server instance # The "XS Demo MCP Server" name is used for identification in clients mcp = FastMCP("XS Demo MCP Server", json_response=True) # Add a UTC Time tool using the @mcp.tool() decorator @mcp.tool() def get_current_utc_time() -> str: """ Returns the current UTC Time """ return f"Current UTC Time: {datetime.now(timezone.utc).isoformat()}" # Add an addition tool using the @mcp.tool() decorator @mcp.tool() def add(a: int, b: int) -> int: """Add two numbers and return the result.""" return a + b # Add a subtraction tool using the @mcp.tool() decorator @mcp.tool() def subtract(a: int, b: int) -> int: """Subtract two numbers and return the result.""" return a - b # Add a dynamic greeting resource @mcp.resource("greeting://{name}") def get_greeting(name: str) -> str: """Get a personalized greeting with sanitized input.""" # Sanitize the name by escaping HTML special characters sanitized_name = html.escape(name) return f"Hello, [{sanitized_name}]!" if __name__ == "__main__": # Run the server using the streamable HTTP transport print("Running MCP server on http://127.0.0.1:8000") mcp.run(transport="streamable-http", port=8000) -
Now run the Python based
MCPServerExpand to see sample output
Sample running MCP ServerRunning MCP server on http://127.0.0.1:8000 ╭──────────────────────────────────────────────────────────────────────────────╮ │ │ │ ▄▀▀ ▄▀█ █▀▀ ▀█▀ █▀▄▀█ █▀▀ █▀█ │ │ █▀ █▀█ ▄▄█ █ █ ▀ █ █▄▄ █▀▀ │ │ │ │ FastMCP 2.14.1 │ │ │ │ │ │ 🖥 Server name: XS Demo MCP Server │ │ │ │ 📦 Transport: HTTP │ │ 🔗 Server URL: http://127.0.0.1:8000/mcp │ │ │ │ 📚 Docs: https://gofastmcp.com │ │ 🚀 Hosting: https://fastmcp.cloud │ │ │ ╰──────────────────────────────────────────────────────────────────────────────╯ [12/26/25 17:40:48] INFO Starting MCP server 'XS Demo MCP Server' with transport 'streamable-http' on http://127.0.0.1:8000/mcp server.py:2618 INFO: Started server process [15528] INFO: Waiting for application startup. INFO: Application startup complete. INFO: Uvicorn running on http://127.0.0.1:8000 (Press CTRL+C to quit)
-
-
Configure
Continueto connect to theMCPServer-
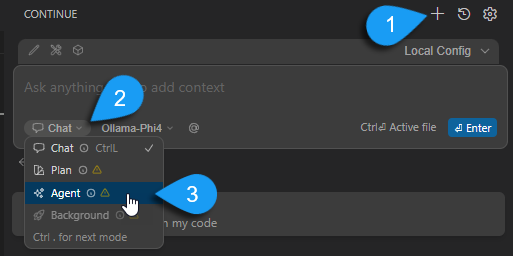
Launch
Continuefrom the Primary Side Bar:
-
Set to Agent mode:
-
Create the
mcp-servers.yamlfile if it doesn’t already exist: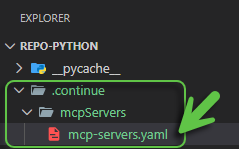
Create the folder structure if it doesn’t already exist. -
If this is a new file, add the following contents:
name: MCP servers version: 0.0.1 schema: v1 mcpServers: -
In the
mcpServerssection, add a new entry with these contents:- name: XS MCP Server (1) url: http://127.0.0.1:8000/mcp (2)1 This is a friendly name 2 The URL for the test MCP server
-
-
Now there should be a new entry for the XS Demo Calculator
MCPServer with a green circle indicating a successful connection: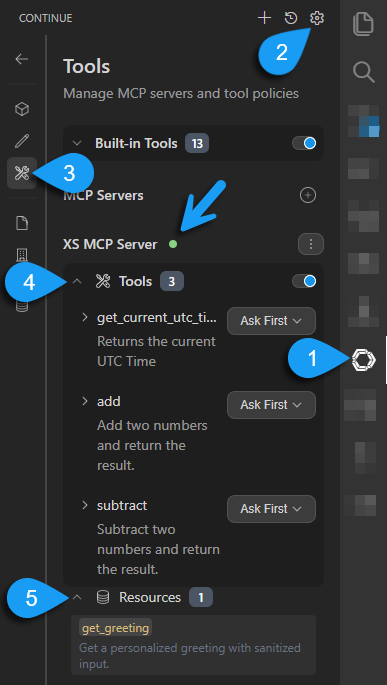
-
Click on the
Continueextension icon. -
Click on the
Configicon. -
Click on the
Toolsicon. -
Expand the
Toolsdropdown. -
Expand the
Resourcesdropdown.
-
-
Additionally, the Python terminal window will display additional output as a result of the Agent interrogating the MCP server:
INFO:     127.0.0.1:62173 - "POST /mcp HTTP/1.1" 200 OK
INFO:     127.0.0.1:62174 - "POST /mcp HTTP/1.1" 202 Accepted
INFO:     127.0.0.1:62173 - "GET /mcp HTTP/1.1" 200 OK
INFO:     127.0.0.1:62175 - "POST /mcp HTTP/1.1" 200 OK
INFO:     127.0.0.1:62174 - "POST /mcp HTTP/1.1" 200 OK
INFO:     127.0.0.1:62175 - "POST /mcp HTTP/1.1" 200 OK
INFO:     127.0.0.1:62174 - "POST /mcp HTTP/1.1" 200 OK
2.2. Test the MCP Server
-
Follow the steps in the screenshot below:
-
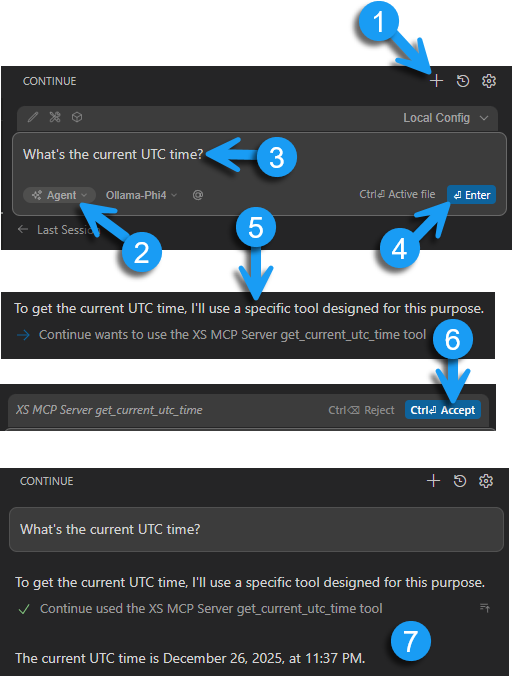
Click the + button to start a new conversation.
-
Select Agent from the drop-down.
-
Type the question: What’s the current UTC time?
-
Click the Enter button.
-
Continue has discovered that the
XS MCP Servercan provide the answer to this question but needs your permission before it can be used. -
Click the Accept button to allow
Continueto use theXS MCP Server. -
Now see the output from the
XS MCP Server.
-