Ollama Notes
1. Prerequisites
-
Ollama works best with a graphics card.
Follow this Nvidia notes doc to install the Nvidia drivers.
2. Install
2.1. Open Ports
-
Firewall ports
Ollamasudo firewall-cmd --add-port=11434/tcp --permanentOpenWeb UI examplesudo firewall-cmd --add-port=3010/tcp --permanentComfy UI examplesudo firewall-cmd --add-port=3011/tcp --permanent -
Reload FW
sudo firewall-cmd --reload
2.2. Podman Config
-
Create Podman Compose file
Expand for source
Podman Config# Ollama API: https://hub.docker.com/r/ollama/ollama # OpenWebUI: https://docs.openwebui.com/ # AnythingLLM: https://anythingllm.com/ # Models: https://ollama.com/library # NVidia Support: https://docs.nvidia.com/datacenter/cloud-native/container-toolkit/latest/install-guide.html#installation services: ollama-api: container_name: Ollama-API image: docker.io/ollama/ollama:latest privileged: true ports: - "11434:11434" environment: - TZ=America/New_York - OLLAMA_CONTEXT_LENGTH=64000 # - OLLAMA_HOST=0.0.0.0 #- HTTPS_PROXY=https://chat.xackleystudio.com volumes: - ./Ollama-data:/root/.ollama/models deploy: resources: reservations: devices: - driver: nvidia count: 1 capabilities: - gpu restart: always #https://docs.anythingllm.com/installation-docker/local-docker # Do this before starting the container for the first time # mkdir ./Anything-LLM-data # podman unshare chown -R 1000:1000 ./Anything-LLM-data anything-llm: container_name: Anything-LLM image: docker.io/mintplexlabs/anythingllm ports: - "3012:3001" environment: - TZ=America/New_York - STORAGE_DIR="/app/server/storage" volumes: - ./Anything-LLM-data:/app/server/storage:Z depends_on: - ollama-api restart: unless-stopped # https://docs.openwebui.com/getting-started/env-configuration open-webui: container_name: OpenWeb-UI image: ghcr.io/open-webui/open-webui:main privileged: true #image: ghcr.io/open-webui/open-webui:cuda #runtime: nvidia ports: - "3010:8080" environment: - TZ=America/New_York - OLLAMA_BASE_URL=http://ollama-api:11434 volumes: - ./OpenWebUI-data:/app/backend/data depends_on: - ollama-api #extra_hosts: # - host.docker.internal:host-gateway restart: always # https://comfyui-wiki.com/en/install comfyui: image: ghcr.io/jemeyer/comfyui:latest # Or another image of your choice #image: docker.io/yanwk/comfyui-boot:cu130-slim #https://github.com/YanWenKun/ComfyUI-Docker/tree/main container_name: ComfyUI restart: unless-stopped environment: - TZ=America/New_York - GIT_PYTHON_GIT_EXECUTABLE=/usr/bin/git #- CLI_ARGS=--fast volumes: - ./ComfyUI-data/data:/app/ComfyUI/data - ./ComfyUI-data/models:/app/models - ./ComfyUI-data/input:/app/input - ./ComfyUI-data/output:/app/output - ./ComfyUI-data/settings:/app/settings - ./ComfyUI-data/flows:/app/flows - ./ComfyUI-data/user:/app/user - ./ComfyUI-data/temp:/app/temp - ./ComfyUI-data/custom_nodes:/app/custom_nodes ports: - "3011:8188" # use http://comyui:8188 when configuring OpenWeb-UI to use ComfyUI security_opt: - label=disable devices: - "nvidia.com/gpu=all" #volumes: #deploy: # resources: # reservations: # devices: # - driver: nvidia # count: 1 # capabilities: # - gpu #environment: # - NVIDIA_VISIBLE_DEVICES=all # Use all available GPUs # - NVIDIA_DRIVER_CAPABILITIES=compute,utility,video,graphics # Enable all necessary capabilities
3. Get Models
3.1. Get Native models
| These are ready-made models for Ollama |
Models can be downloaded via the OpenWebUI interface as well.
|
-
Model names can be found here.
-
Via the
Ollama-APIcontainer:podman exec -it Ollama-API ollama pull deepseek-coder-v2:16b
3.2. Foreign Models
| These are models that may need to be either converted or downloaded in a different format for use in Ollama |
3.2.1. Hugging Face (GGUF)
| Ask Google, "how to load huggingface model into ollama" |
-
These are models tagged with the
GGUGtag.-
Launch the HuggingFace download page.
-
On the left-hand side, select either:
-
-
Search for and click the model’s name.
-
Click on the File and versions tab.
-
Search for the desired quantized version.
Choose a model where the cumulative file(s) size will fit into the GPU’s vram. -
For a single file, download it via the
Ollama-APIcontainer:Example loading thebartowski/Llama-3.2-1B-Instruct-GGUFmodelpodman exec -it Ollama-API ollama pull hf.co/bartowski/Llama-3.2-1B-Instruct-GGUF:latest -
For multiple files:
-
Download the original model files (e.g., .bin, .safetensors, config.json).
-
Clone the
llama.cpprepository and install its dependencies. -
Run the
convert-hf-to-gguf.pyscript to generate a GGUF file. -
Now follow the instructions for loading a single file?
-
-
-
3.2.2. Hugging Face (GGUF or Safetensors)
-
These are models tagged with either the
GGUGorSafetensorstag.-
Launch the HuggingFace download page.
-
On the left-hand side, select either:
-
-
3.2.3. Hugging Face (non-GGUF)
-
Download model from HuggingFace.
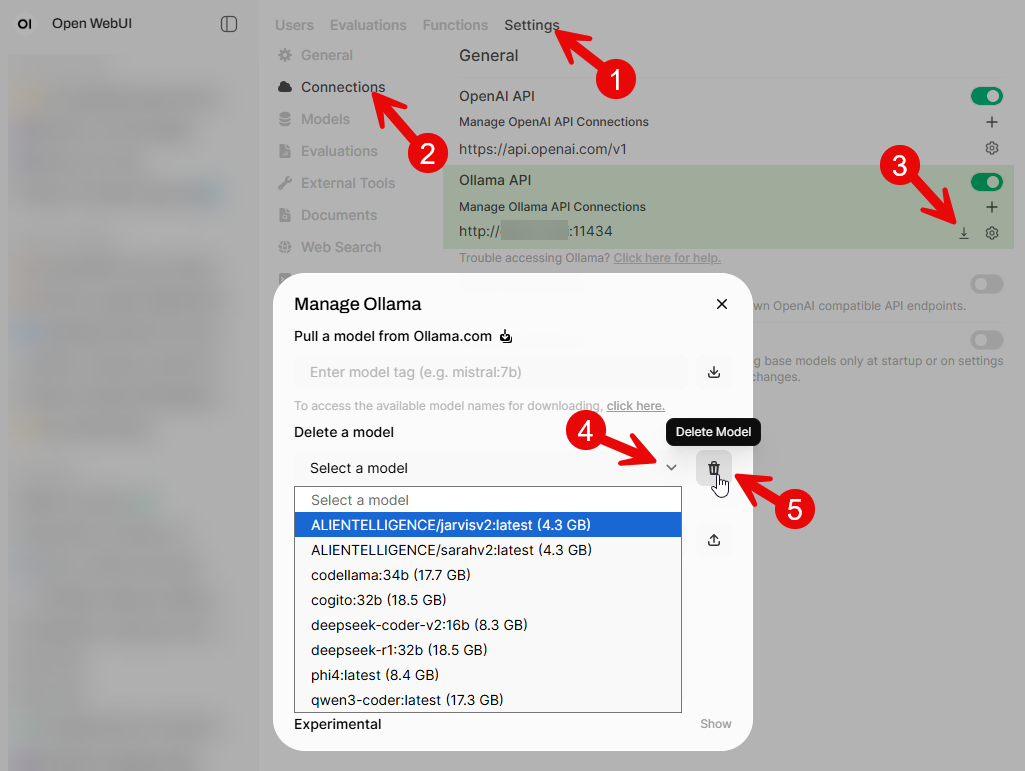
4. List Models
-
Via the
Ollama-APIcontainer:Run this commandpodman exec -it Ollama-API ollama listSample outputNAME ID SIZE MODIFIED joshuaokolo/C3Dv0:latest 0e44735f72fb 7.3 GB 3 days ago phi4:latest ac896e5b8b34 9.1 GB 8 days ago codellama:34b 685be00e1532 19 GB 2 weeks ago qwen3-coder:latest 06c1097efce0 18 GB 2 weeks ago deepseek-r1:32b edba8017331d 19 GB 2 weeks ago deepseek-coder-v2:16b 63fb193b3a9b 8.9 GB 2 weeks ago
5. Currently Running Models
-
Via the
Ollama-APIcontainer:Run this commandpodman exec -it Ollama-API ollama psSample outputNAME ID SIZE PROCESSOR CONTEXT UNTIL gpt-oss:120b a951a23b46a1 68 GB 100% GPU 64000 3 minutes from now
7. VS Code Integration
If you want to use a model that is not available as a built-in model or want to control the model hosting, you can bring your own language model API key (BYOK) to use models from other providers or to run models locally. For background on why you might bring your own key and what to consider, see Bring your own language model key.
BYOK models work without signing in to a GitHub account and without a Copilot plan. You can add models with the Chat: Manage Language Models command even when you are not signed in. This enables you to use AI chat features entirely with your own models, including fully offline scenarios with local models such as Ollama.
7.1. Via Gui
-
Open the cmd palette window with: cntrl+shift+p
-
Select
Chat: Manage Language Models -
Click the + Add Model… drop down button.
-
Choose Ollama.
-
Supply a
Group Name. -
Supply the IP address or server name.
7.2. Via JSON
-
Edit the
chatLanguageModels.json:WindowsC:\Users\<user name>\AppData\Roaming\Code\User\chatLanguageModels.jsonSample config[ { "name": "Ollama p-rocky-ai", "vendor": "ollama", "url": "http://p-rocky-ai:11434" }, { "name": "Ollama p-rocky-phoenix", "vendor": "ollama", "url": "http://192.168.1.53:11434" } ] -
To open the
chat windowuse one of:-
Menu:
-
cntrl+alt+i
-
-
In the bottom of the chat window, click on the currently selected model.
-
From here you can either search for a model or click on Other Models and choose one of the other local models.