Windows Server Notes
1. Windows Server 2022 Build
1.1. Installing Windows Server Essentials Experience
Windows Server 2022 Essentials doesn’t contain the Remote Desktop Gateway server role so the Anywhere Access/Remote Web Access feature will not be available.
This document describes the process of ripping the Essentials Experience functionality out of Windows Server 2016 and installing it on Windows Server 2019.
2. Enable Windows Hello for Domain Joined Computers
-
The following will allow domain joined computers to use
Windows Helloas an alternative to using a username/password combination to securely login in to the domain via a:-
fingerprint reader
-
facial recognition camera
-
secure PIN
-
-
The following step will enable this functionality:
-
Launch
Group Policy Management. -
Expand
Group Policy Management → Domains → Dhante.local → Default Domain Policy -
Right mouse click on
Default Domain Policyand click the Edit button. This will launch theGroup Policy Management Editorwindow. -
Enable
Secure PIN:-
Expand
-
Enable
Turn on convenience PIN sign-in
-
-
Enable
Biometrics:-
Expand .
-
Enable all 3 of the
Allow*policies.
-
-
3. Troubleshooting
3.1. EFI Boot Loader
|
If you are having issues booting into Windows the following procedure will help restore the Original source documentation is here |
-
Boot the PC from the Microsoft Windows installation media iso.
-
At the
Windows Setupwindow click Shift+F10 to open a command prompt.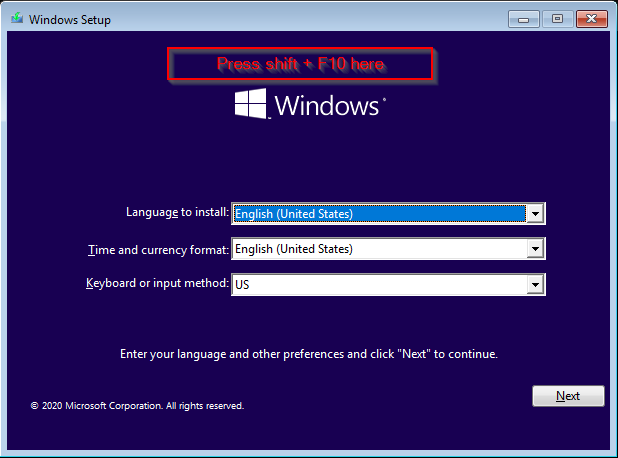
-
Start the
DiskParttool: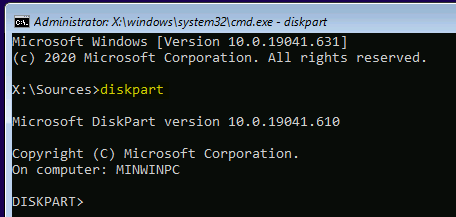
-
Get a listing of disks with the
list diskcommand.This recovery guide is intended for GPT partitioned disks so confirm that your Window disk is GPT partitioned as indicated with an asterisk in the Gpt column:

If your disk is not using the GPT partition table, then you’ll need to find a MBR related recovery guide.
-
Select your system disk with the
select diskcommand followed by the disk number. In this case the disk number is 0: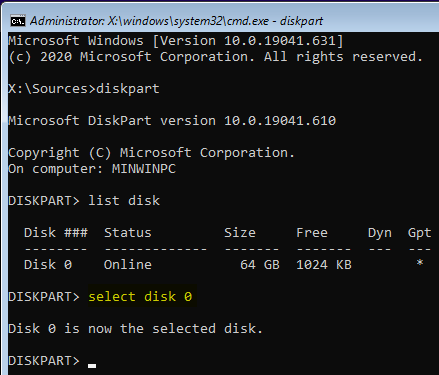
-
Display both the partitions and volumes on the selected disk with the
list partitionandlist volumecommands: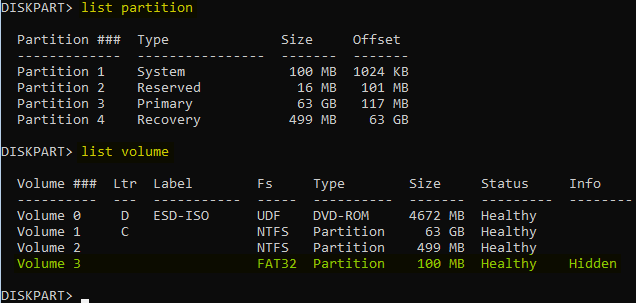
The EFI volume is indicated where
Fs=FAT32,Size=100MB,Info=Hiddenas highlighted in green above. -
Now we need to select the EFI volume and assign it a drive letter. We will use drive letter K:

-
Exit the
DiskParttool: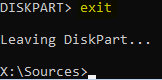
-
Enter the
bootloader directory using the previously assigned drive letter K: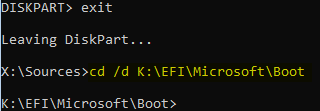
-
Recreate the BCD store by copying the UEFI boot environment files to the boot partition from the Windows directory:
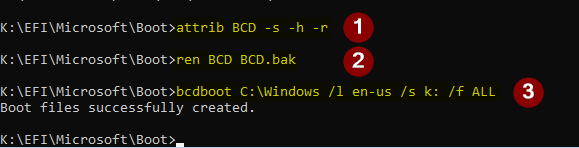
-
Confirm:

-
Now you can reboot with a working
BCD.
3.2. Windows Server Essentials (Domain Join)
-
Open a browser and connect to https://remote.dhante.com/Connect/
-
If the connection takes a long time and fails you may have to enable Network Sharing. The error message will look like the following:
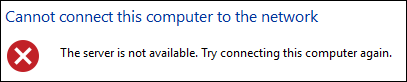
-
Do the following to fix:
-
Click on
Network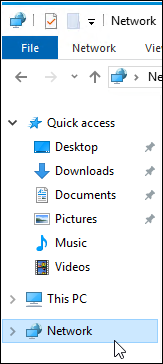
-
Acknowledge
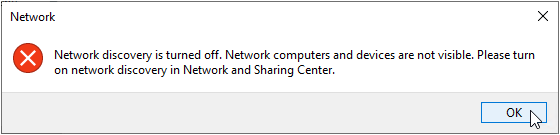
-
Click

-
-
If the
Configuration Wizardfails to download the package: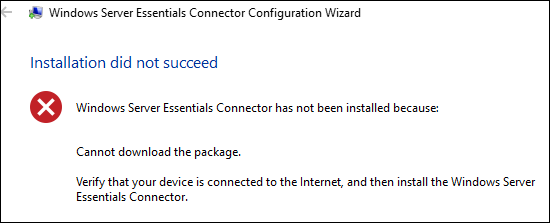
-
Execute the WSEClient msi contained within this repo.
-
Retry the
Configuration Wizard.
-