Universal-Extension-Notes
1. Create a new Universal Extension Project
-
The official Stonebranch documentation can be here.
-
A training webinar is also available.
1.1. Create Project from Template
-
Launch a new
Visual Studio Code(VSC) Window -
Click on the
Stonebranch Extensionicon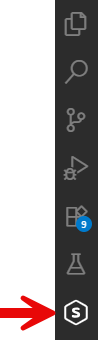
-
this will open a tree view
-
-
Expand the EXTENSION TEMPLATES tree view item.

-
Hover over the
ue-tasktemplate and afolder+icon will appear. Click the icon to initialize a new project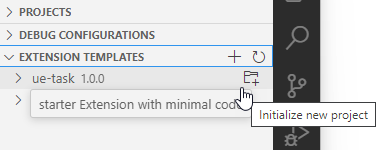
-
Select a new empty folder for the project.
-
Set up 8 config values. The default values can be used except for the following:
#1-Extension Name This is the Extension’s .zip file name (e.g. laz-uac-clone-ext.zip) that will also appear as the Extension name when viewing the
Universal Templatedetails in the gui.Universal Template details with Extension name highlighted
#5-Zip_safe false
#6-Extension Owner Name This is the Extension Owner
#7-Extension Org Name This is the Extension Owner’s Organization
#8-Universal Template Name This is the label for the Extension e.g., LAZ-UAC-Clone-ext
Universal Template details with Name highlighted
-
Click the Open in new workspace button
-
After a moment, the following project structure will appear. The main extension file has been highlighted.
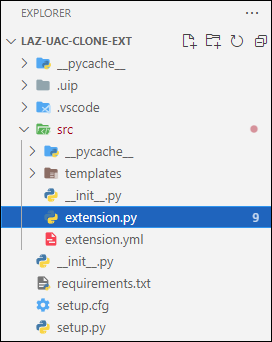
\src\extension.py is the main source file for the extension.
Define the custom extension functionality in the
extension_startmethod
1.2. Add the Universal Extension Base Package
-
The Universal Extension Base Package (universal_extension) is a Stonebranch provided Python package containing a collection of classes and functionality required to develop Universal Extensions. This package is distributed with the Universal Agent.
The package resides within a zip archive (universal_extension.zip) and is installed to the following locations on hosts where the OpsWise Agent is installed:
Table 1. Universal Extension Base Package locations Platform Location Windows
C:\Program Files\Universal\UAGSrv\uext\universal_extension.zip
Linux
/opt/universal/uagsrv/uext/universal_extension.zip
-
Add this package to the project:
-
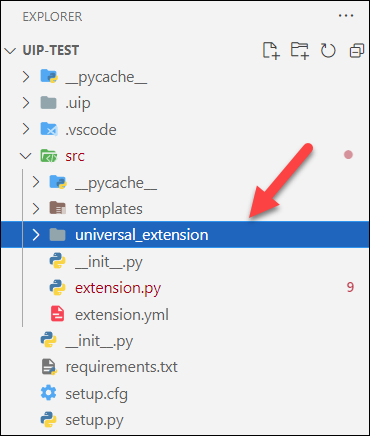
Extract the zip file. This will result in a folder named
universal_extensioncontaining several Python files and sub folders -
Take the entire folder and copy it into the
\srcfolder of the project -
The project structure should look like the following:
-
-
Add a path to the
.vscodefolder by editing thesettings.jsonfile.-
Open the settings.json file located in the .vscode folder.
-
Add the following to python.analysis.extraPaths
".\\src",Example{ "python.analysis.extraPaths": [ ".\\src", (1) "C:\\Users\\username\\AppData\\Roaming\\Python", "c:\\source\\the-project\\.uip\\typings" ] }1 this is the new line
-
1.3. Configure Project Credential and URL
-
VSC will communicate with OpsWise via a user id which will be used to remotely update the extension and optionally remotely launch a Task based on the extension.
-
Create a user e.g., lfops_web_servicer_ext with the following :
-
Web Service Access = enabled
-
User Roles: ops_universal_template_admin -
Permissions:Table 2. User ID permissions Type Operations Commands Name Unassigned to Business Service Business Services Agent
Execute
*
Yes
*
Credential
Execute
*
Yes
*
Task
Read
Launch
*
Yes
*
Task Instance
Read
ALL
*
Yes
*
Script
Execute
*
Yes
*
Agent Cluster
Read
Resolve Agent Cluster
*
Yes
*
-
Via the palette menu (Ctrl+Shift+P) provide credential details for the new user:
-
UIP: Set User ID
Example Userlfops_web_servicer_ext -
UIP: Set Password
-
-
Set the webservices URL
-
UIP: Set URL
Example URLhttp://p-ubuntu-nas:8085/ucThis is the Web Service URL and port - not the Web Browser URL and port
-
-
1.4. Deploy Extension to OpsWise Controller
-
Click on the
Stonebranch Extensionicon-
this will open a tree view
-
-
Expand the Projects tree view item.
-
Your new project should appear here.
-
-
Right mouse click on the project and select UIP: Push All
This will:
-
Build the project
-
Create a distribution package.
-
Push the distribution package to the OpsWise controller viewable as a
Universal Template
-
-
The new
Univeral Templateshould appear in the OpsWiseUniversal Templatelist view tab.
You may need to click the refresh button first If the new Univeral Templatedoesn’t appear in the list, create it manually. -
The
Universal Templatedetails window will look similar to the following: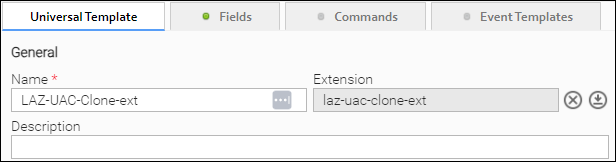
1.5. Run a Task based on the new Extension
-
The new extension will be available for use just like any other extension imported from the Stonebranch Market Place
-
Create a new Task based on the new extension
-
Now you can either launch the new Task normally via OpsWise or remotely via VSC
-
To launch via VSC:
-
First, via the palette menu (Ctrl+Shift+P) select UIP: Set Target Task and supply the name of the newly created Task.
-
To launch the Task, via the palette menu, select UIP: Task Launch
-
-
After the Task Instance has completed, any output will automatically be retrieved and displayed in the terminal window of VSC
Sample Task Instance outputPS .\source\UAC-UI-Test> & ".\Python\Python310\python.exe" -m uip.main task launch XS-Test-ext-Test Successfully launched the Universal task "XS-Test-ext-Test" with task instance id 17064474374868716927TMVIODBHHR8C. ======================================================================================= Status: Success (1) ======================================================================================= EXTENSION Output: ================= Hello Extension! (2) STDOUT Output: ============== Hello STDOUT! (3) STDERR Output: ============== [empty] (4)1 Task status result 2 Extension specific output not related to stdout or stderr 3 Regular stdout output from the Task 4 Regular stderr output from the Task
-
2. Field Types
-
View them here.
3. Adding 3rd Party Python Package Dependencies
-
Universal Extensionscan integrate third party Python Package.If authoring on a Windows desktop, the following will result in Windows based packages being included in the package.
This may be an issue for Universal Extension bound for *Nix based systems.-
Edit the
src\extension.ymlfile and confirmzip_safeis set to false.extension: name: ue-task version: "1.0.0" api_level: "1.4.0" requires_python: ">=2.6" zip_safe: false (1) owner: name: Stonebranch organization: Stonebranch Inc. comments: | Created using ue-task template1 zip_safeshould be false -
In order to add a particular Python Package, first identify a specific package version from the PyPi site
-
Add the dependency as a package name and version to the
requirements.txtfileExample for the paramiko packageparamiko -
Add the standard import statement to the
extension.pyfileimport statementimport paramiko -
Build the project
-
Click on the Stonebranch Extension icon
-
On the project, right mouse click and select UIP: Push All
-
-
After a successful build, the package and any co-requisites will appear in the
\3ppfolder
-
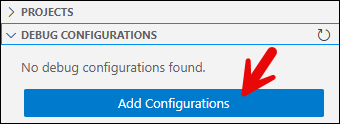
4. Debugging
-
Full documentation can be found here.
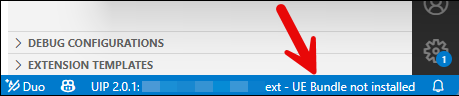
4.1. Install UE Bundle
-
Download the latest universal_extension_bundle_2.x.x.zip file from the Stonebranch Customer Portal.
This file will be referenced later… -
Click on the
Stonebranch Extensionicon. -
Click on the bottom title bar where it says, UE Bundle not installed.
-
Select the latest version of the UE API.
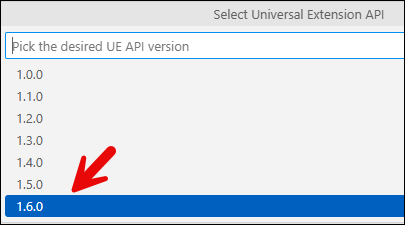
-
Click the Yes button to install.

-
Click the Path to universal_extension_bundle… button.
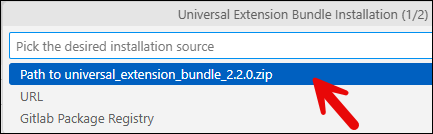
-
Select the path where the universal_extension_bundle_2.x.x.zip file was downloaded.
-
Now the Universal Extension Bundle version appears:


5. Dynamic Choice Fields
-
These choice fields will be available to "UE Task" types at definition time and allow the user to select values that are populated by the target agent system prior to task submission.
5.1. Create
-
Via the OpsWise gui, edit the
Universal Templateand create a new field where the Type=ChoiceWhile fields can be created via VSC it’s easier to create them via the OpsWise gui Table 3. Sample Dynamic Choice Field Name Label Type test_dynamic_choice
Dynamic Field
Choice
5.2. Sync the Updated Template with VSC
-
Changes made in the gui need to be synchronized with the VSC project
-
Click on the Stonebranch Extension icon
-
On the project, click on the UIP: Pull button
-
5.3. Update Code
-
Add the following import statement to the top of the code:
from universal_extension.deco import dynamic_choice_command -
Create the function to return dynamic choice results
    @dynamic_choice_command("test_dynamic_choice")  (1)
    def the_dynamic_function(self,field):
        return ExtensionResult(
            rc=0,
            message="",
            values=["Value 0","Value 1","Value 2"]
            )
1 The value supplied to the dynamic_choice_command decorator must match the field name of the associated Dynamic Choice field in the Controller’s Universal Template