OpsWise Windows Controller Install
1. Installing the OpsWise Controller
1.1. Installation Synopsis
-
This document describes the setup procedure for installing the
Univeral Automation Controller(OpsWise) on a Windows server. -
Top level OpsWise documentation can be found here.
1.2. Install Prerequisites
-
Prerequisite details are here.
1.2.1. Java
-
Download the Oracle JDK or the OpenJDK JRE
1.2.2. Apache Tomcat
-
If installing on a Windows Server, download the
Service Installer.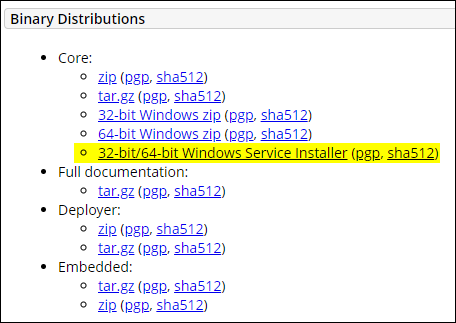
-
Test the installation by launching browser window to: http://localhost:8080
1.2.3. Database
-
MYSqlDB (MariaDB) instructions
-
First log on…
Windows log on instructions
-
Log on the Windows Server that host the MariaDB instance.
-
Open a command prompt to the bin folder, e.g.
C:\Program Files\MariaDB 12.2\bin -
Connect
mariadb --user=root
-
-
Create the DB
CreateCREATE DATABASE uc;ConfirmSHOW DATABASES;Sample output
Sample Output+--------------------+ | Database | +--------------------+ | information_schema | | mysql | | performance_schema | | sys | | test | | uc | +--------------------+ 6 rows in set (0.019 sec) -
Create the user
Create userCREATE USER 'opswise_db_admin'@'%' IDENTIFIED BY 'SecureP@ssw0rd';Grant user privilegesGRANT ALL PRIVILEGES ON uc.* TO 'opswise_db_admin'@'%';Take immediate effectFLUSH PRIVILEGES;ConfirmSHOW GRANTS FOR 'opswise_db_admin'@'%';Sample confirmation
Sample text+-----------------------------------------------------------------------------------------------------------------+ | Grants for opswise_db_admin@% | +-----------------------------------------------------------------------------------------------------------------+ | GRANT USAGE ON *.* TO `opswise_db_admin`@`%` IDENTIFIED BY PASSWORD '*E8CB1234DD95123446ABF5CCF1234F8985991234' | | GRANT ALL PRIVILEGES ON `uc`.* TO `opswise_db_admin`@`%` | +-----------------------------------------------------------------------------------------------------------------+
-
-
-
Create the
opswiseDBdatabase.create database opswiseDB -
Create the
opswiselogin account for the opswise DBuse master; create login opswise_db_admin with password = 'A-complex-passwd123'; use opswiseDB; create user opswise_db_admin for login opswise_db_admin; exec sp_addrolemember db_owner,opswise_db_admin;
-
1.2.4. Product downloads
-
Log on to the
Software Downloadssection of the StoneBranch Portal. -
From here links are available for the
Universal ControllerandUniversal Agentdownloads.
1.3. Install
-
Review platform support and prerequisites here.
-
Review any relevant release notes here for the particular version.
-
Install
The original Universal Controllerinstallation instructions can be reference here.-
Unzip the
universal-controller-7.x.x.x.zipfile. -
Create a new file named install-controller-win.bat in the recently unzipped universal controller folder.
Don’t overwrite the original install-controller.batfile! -
Update the new file with the one of the following contents:
Expand for MYSQL (MariaDB)
install-controller-win.batContentsinstall-controller.bat ^ --tomcat-dir "c:\Program Files\Apache Software Foundation\Tomcat" ^ --controller-file universal-controller-7.9.2.1-build.10.war ^ --rdbms mysql ^ --dburl "jdbc:mysql://v-winserv-uac:3306/" ^ --dbname opswiseDB ^ --dbuser opswise_db_admin ^ --dbpass A-complex-passwd123 ^Expand for SQLServer
install-controller-win.batContentsinstall-controller.bat ^ --tomcat-dir "c:\Program Files\Apache Software Foundation\Tomcat 9.0" ^ --controller-file universal-controller-7.6.0.3-build.151.war ^ --rdbms sqlserver ^ --dburl "jdbc:sqlserver://v-ubuntu-sql:1285;instanceName=SQLExpress;DatabaseName=opswiseDB;sendStringParametersAsUnicode=false" ^ --dbname opswiseDB ^ --dbuser opswise_db_admin ^ --dbpass A-complex-passwd123 ^ -
Edit the
install-controller-win.batwith updated values. -
Launch an elevated CMD prompt.
-
Run the
install-on-windows.batfile:install-controller-win.bat-
Confirm there is a new
C:\Program Files\Apache Software Foundation\Tomcat\webapps\uc.warfile. -
Confirm the values in the
C:\Program Files\Apache Software Foundation\Tomcat\conf\uc.propertiesconfig file.
-
-
Start (or restart if already running) the
Apache TomcatserviceThis step will take a few minutes to create the DB tables. -
Check the
C:\Program Files\Apache Software Foundation\Tomcat\uc_logs\uc.loglog file for errors. -
If you see the following error:
Expand for error details
2024-08-19-16:33:29:399 -0400 INFO [UC.Bootstrap @@16:33:29.378736100-NC] Attempting connection to: jdbc:sqlserver://v-ubuntu-sql:1285;instanceName=SQLExpress;DatabaseName=opswiseDB;sendStringParametersAsUnicode=true with User: opswise_db_admin 2024-08-19-16:33:30:668 -0400 ERROR [UC.Bootstrap] SQLException - SQLCode: 0 SQLState: 08S01 Message: "encrypt" property is set to "true" and "trustServerCertificate" property is set to "false" but the driver could not establish a secure connection to SQL Server by using Secure Sockets Layer (SSL) encryption: Error: PKIX path building failed: sun.security.provider.certpath.SunCertPathBuilderException: unable to find valid certification path to requested target. ClientConnectionId:6c2e267c-23d4-446d-be33-7843d08a61e5 Exception Class: SQLServerException com.microsoft.sqlserver.jdbc.SQLServerException: "encrypt" property is set to "true" and "trustServerCertificate" property is set to "false" but the driver could not establish a secure connection to SQL Server by using Secure Sockets Layer (SSL) encryption: Error: PKIX path building failed: sun.security.provider.certpath.SunCertPathBuilderException: unable to find valid certification path to requested target. ClientConnectionId:6c2e267c-23d4-446d-be33-7843d08a61e5 -
Do the following:
-
Shutdown the
Apache Tomcatservice -
Edit the
install-controller.batfile -
Update the
--dburloption withencrypt=false;trustServerCertificate=true;Expand for updated file
install-controller.bat ^
--tomcat-dir "c:\Program Files\Apache Software Foundation\Tomcat" ^
--controller-file universal-controller-7.6.0.3-build.151.war ^
--rdbms sqlserver ^
--dburl "jdbc:sqlserver://v-ubuntu-sql:1285;instanceName=SQLExpress;DatabaseName=opswiseDB;sendStringParametersAsUnicode=true;encrypt=false;trustServerCertificate=true;" ^ (1)
--dbname opswiseDB ^
--dbuser opswise_db_admin ^
--dbpass A-complex-passwd123 ^
1 this is the updated line -
Restart the
Apache Tomcatservice
-
-
Test by launching the Opswise interface: http://localhost:8080/uc on the server where Opswise has been installed.
-
Log in with
ops.adminadministrator account and leave the password blank.You will immediately be prompted for a new password. -
Now you’ll see the initial dashboard with
System Details.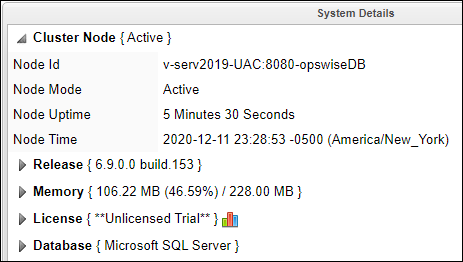
-
2. Configure Firewall
-
Open the following Ports on the server that hosts the Opswise Controller:
-
8080for the web portal -
7878for the OMS Server
-
-
Launch an elevated CMD prompt window.
-
Open port
80for the web portal.netsh advfirewall firewall add rule name = UAC-Web dir = in protocol = tcp action = allow localport = 80 remoteip = localsubnet profile = DOMAIN -
Open port
443for the web portal using SSL.netsh advfirewall firewall add rule name = UAC-WebSSL dir = in protocol = tcp action = allow localport = 443 remoteip = localsubnet profile = DOMAIN -
Open port
7878for the OMS Servernetsh advfirewall firewall add rule name = UAC-OMS dir = in protocol = tcp action = allow localport = 7878 remoteip = localsubnet profile = DOMAIN -
Open port
8080for the Opswise web API.netsh advfirewall firewall add rule name = UAC-WebAPI dir = in protocol = tcp action = allow localport = 8080 remoteip = localsubnet profile = DOMAIN -
Test by launching the Opswise API: http://v-serv2022-UAC:8080/uc/resources/user/list on any host other than the server where Opswise has been installed.
This will result in an XML list of user accounts.
3. Install OMS
-
Follow the Agent install instructions.
4. Add OMS Config
-
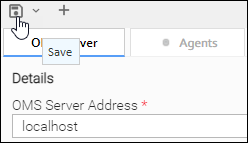
Click on the menu link
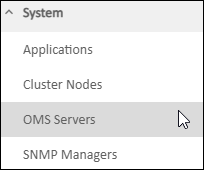
-
Provide
Nameof the Server that hosts theOMS.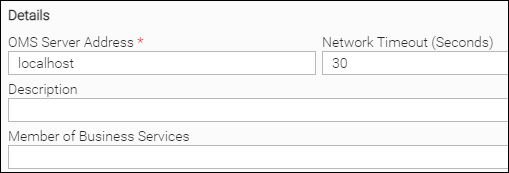
-
Click the Save button.
-
The
OMSshould transition into theConnectedstate: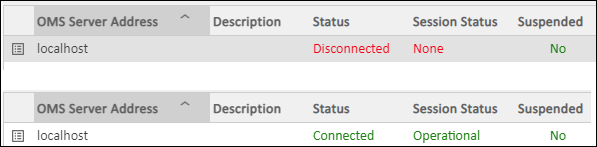
5. LDAP Setup
5.1. Configure LDAP
-
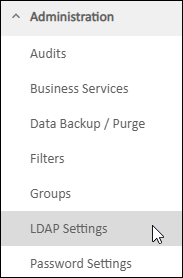
Click on the menu link.
-
Configure the following
LDAPrelated values: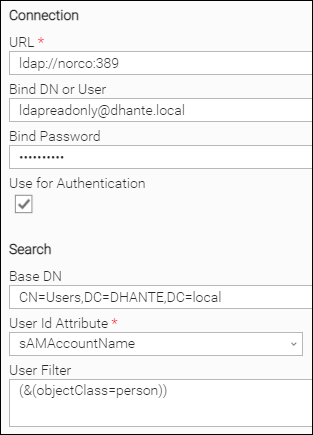
-
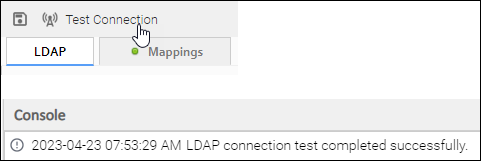
Test the configuration with the Test Connection button.
-
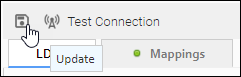
Click the Update button to save the config.


6. Install Built-In Universal Templates
| These templates are included with the UAC but are not available immediately upon install. They need an additional step. |
-
Original doc is here
7. Uninstalling the Opswise Controller
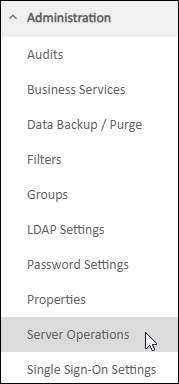
8. Administration
-
Top level document
9. Misc
9.1. Changing the Opswise DB Password
Changing the opswise DB password involves:
-
changing the password on the DB server that hosts the DB.
-
updating the
uc.propertiesfile with the new passord. -
restarting the Opswise Controller(s)
Here is the general process:
-
Update the password for the
opswiselogin account on the DB server.At this time you do not need to shutdown the already running Opswise Controller(s). This will be done later. -
Update the
uc.propertiesfile-
Connect to the server that hosts the
Opswise Controller. -
Edit the
C:\Program Files\Apache Software Foundation\Tomcat 9.0\conf\uc.propertiesfile. -
Add a new property named
uc.db.passwordcontaining your new password:uc.db.password.encrypted=oT3pHpvCdWfLplAabtelL/uKxcr2ccfsNS8fQlm/4Xg=:kc4ZJPSydOVk9v5MFM6O9g== uc.db.password=A-New-Password123 (1)1 This is a new property/value pair for the recently updated password. -
Save the updated
uc.propertiesfile. -
Plan a restart of Opswise which will entail restarting the
Apache Tomcat 9.0service.Ideally you should plan to restart the Opswise ControllerASAP since the opswise DB login account’s password will be stored as unencrypted plain-text within theuc.propertiesfile. -
After the service has been restarted, the
uc.propertiesfile will be updated where:-
the
uc.db.passwordproperty will be removed. -
the
uc.db.password.encryptedproperty will be updated with the encrypted version of the new password:uc.db.password.encrypted=BcTQwZO+BHv3JayzAOQXKw==:LvHkia+TScHTmRC97U+eMg== (1)1 Encrypted version of the new password,
-
-
Check the log file:
C:\Program Files\Apache Software Foundation\Tomcat 9.0\uc_logs\uc.logand if you see the following, then there’s an issue with the password or you’ve restarted the Controller prior to updating theuc.propertiesfile:2021-03-30-10:46:31:893 -0400 ERROR [http-nio-8080-exec-37] SQLException - SQLCode: 18456 SQLState: S0001 Message: Login failed for user 'opswise' ClientConnectionId:3c18f46d-41b5-48b4-bf9d-3f72e61cd614 Exception Class: SQLServerException com.microsoft.sqlserver.jdbc.SQLServerException: Login failed for user 'opswise'.
-